Demo
You can generate code for the selected and prepared set as well as directly for model elements.
Code Generation for a Set
Start code generation once the set or sets are prepared. For more details about creating and editing sets, see Code Engineering Sets.
- Choose Generate from the Code Engineering Sets item shortcut menu. It allows code generating for all created sets.
- Choose Generate from the selected set shortcut menu. It allows code generating only for the selected set.
The Code Generation Options dialog box appears.
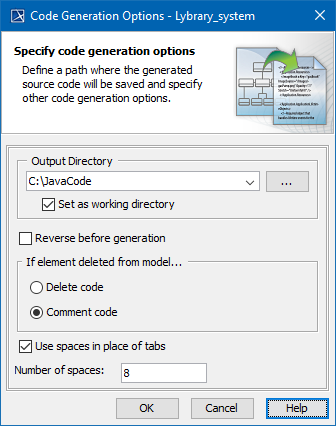
Code Generation Options dialog box.
The Code Generation Options dialog box allows you to specify the way your code will be generated.
Once you specify generating options for the set, code can be generated.
| Box Name | Function |
|---|---|
Output Directory | Type the directory where the generated files will be saved. |
| The Set Output Directory dialog box appears. Select the directory for the generated files. |
| Set as Working Directory | The output directory is set as a working directory and files are saved to the working directory. |
| Reverse before generation | Changes your model according to changes in the existing code. Exercise caution when selecting the Reverse before generation check box. If the model differs from the code, all differences in the model will be discarded. In these cases, you will lose some of your work. |
| If element deleted from model | To influence the structure of generated code, click one of the following option buttons:
|
| Use spaces in place of tabs | When selected, spaces (instead of tabs) will be written to the code file. |
| Number of spaces | Specify the number of spaces to be written. |
| OK | The Messages Window appears, displaying how code files are being generated. The Messages Window informs you about problems and errors (mainly file access and syntax errors) found in the code generation process and generation summary. You are also prompted to confirm that you wish to overwrite the file if the output directory already contains one with the same name. |
| Cancel | Closes the dialog box without saving changes. |
| Help | Displays MagicDraw Help |
Code Generation for a Model Element
All the classes contained in the component will be written to one file. However, code for the class can be generated in a different way. Select the class to generate in the browser Data package and click Generate in the class shortcut menu. For packages and components, you can also select Generate, but you will not be able to specify the generation options. All the options related to that task will be set according to the default values.
If you choose framework generation for a single class or for packages, the Code Generation Options dialog box does not appear. The code is generated according to the default values.
If no errors occurred, you can view the results with your favorite file viewer or programming environment. Look for the files in the directory you specified as your Working directory in the Round Trip Set dialog box or in the Project Options dialog box. Additional sub-directories could be created.