Code Engineering Options for all Sets in your Project
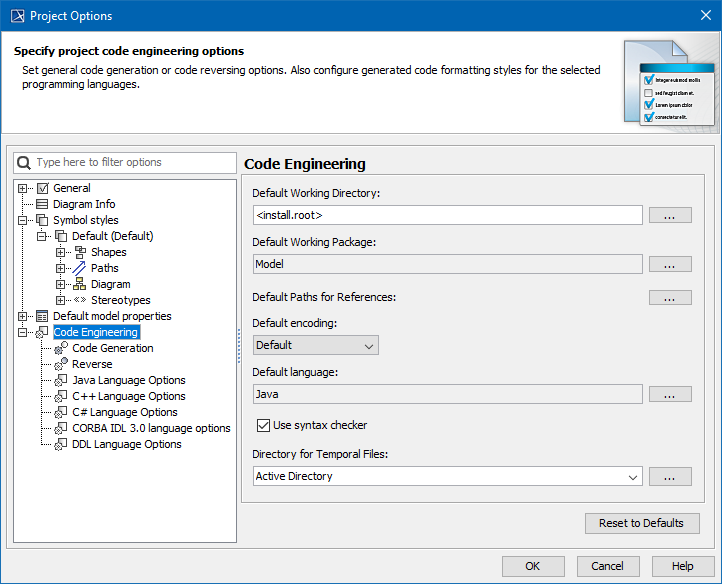
Choose Project from the Options menu. The Project Options dialog box appears. You can set the Code Engineering options in the Project Options dialog. The Project Options dialog box has two main collections of customizable options, represented by the hierarchy tree on the left side of the dialog box. The figure below illustrates Code Engineering related options.
Code Engineering options in the Project Options dialog.
In the option list, select Code engineering and specify the following items:
| Item name | Description |
|---|---|
| Default Working Directory | Enter the name of your working directory. |
| Default Working Package | Define any package for the reverse output or code generation. Your model will be reversed or the code will be generated from this specified package. |
| Default Paths for References | Add specific profiles, used projects, or libraries to define where to search for paths for references during reverse/code generation. |
| Default Encoding | Click to open a list of available encodings. |
| Default language | When selected, the syntax checker of the selected language runs while Code Engineering is executed. |
| Use Syntax Checker | When selected, the syntax checker runs while Code Engineering is executed. |
| Directory for Temporal Files | You can specify Active Directory, System, or you can select another directory. |
The following table describes other Code Engineering options:
| Option | Element Name | Description |
|---|---|---|
| Code Generation | Set code generation options using the fields listed in the right side of the Project options dialog box. The Code generation area contains boxes with the same functionality as the Code generations options dialog box. See Generating Code. | |
| Reverse | Set reverse options for all reverse actions of the project using the options listed on the right side of the Project options dialog box. The Reverse Options area contains boxes that have the same functionality as in the Reverse options dialog box. | |
| Java Language Options Set the generated code style for Java programming languages in the Default language field found on the right side of the Project Options dialog box. | Generate opening bracket in new line | Opens a bracket in the new line being generated. |
| Generate spaces | Generate spaces inside an assignment and other operators. | |
| Generate empty documentation | Comment brackets are placed in your code, unless class in the model has no documentation. | |
| Automatic “import” generation | Automatic generation of "import" sentences according to classes referenced in the generated class. | |
| Class count to generate import on demand | Specify the number of classes imported from a single package until all statements importing a single class are substituted with a statement importing an entire package. | |
| Documentation Processor | After selecting the Java Doc processor, click to open the Documentation Properties dialog box. | |
| Style | Two styles are available for documentation. | |
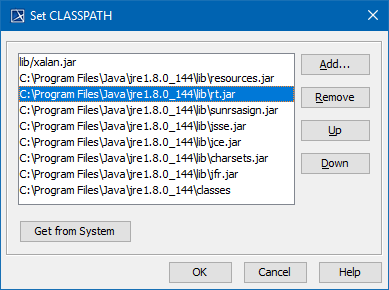
| Use CLASSPATH | The button is activated. Search a classpath for importing sentence generation in the Set classpath dialog box. Click Get from System to get the CLASSPATH variable defined by the operating system or click Add and select the classpath directory. | |
| Java Source | Available choices are 1.4, 5.0, 7.0, or 8.0. | |
| Header | Add a specific header to all your code files. Click and enter the header text in the Header dialog. You can also define $DATE, $AUTHOR, and $TIME in the header. | |
C++ Language Options Set the generated code style for C++ programming languages. | Generate opening bracket in new line | Opens a bracket in the newly generated line. |
| Generate spaces | Spaces inside an assignment and other operators are generated. | |
| Generate empty documentation | Comment brackets are placed in your code, unless the class in the model has no documentation. | |
| Generate methods body into class | Select check box to generate methods body into class. | |
| Generate field initialization into class | Generates the value initialization for the attribute. | |
| Automatically remove unnecessary usage relationship | Tracks the use of classes and removes the unnecessary include directives. | |
| Documentation Style | Four styles are available for documentation. | |
| Use include path | Click and then specify the path for the #include directives in the Set Include Path dialog box. | |
| Use explicit macros | Select the check box. The button is activated. Click it and use a set of predefined macros in the C++ Macros dialog box. | |
| Header | Add the specific header to all your code files. Click and enter the header text in the Header screen. You can also define $DATE, $AUTHOR, and $TIME in the header. | |
| CORBA IDL 3.0 language options | Generate documentation | Includes the documentation of an element in the comment. |
| Generate opening bracket in new line | Opens a bracket in the newly generated line. | |
| Generate spaces | Spaces inside an assignment and other operators are generated. | |
| Generate empty documentation | Comment brackets are placed in your code, unless the class in the model has no documentation. | |
| Generate imports | Generation of "import" statements for classes referenced in the generated class. | |
| Generate preprocessor directives | Generates pre-processors directives. | |
| Generate end comments for composite elements | Generates end comments with composite element names. | |
| Generate operation parameters on the new line | Generates operation parameters on the new line. | |
| Documentation Style | Three styles are available for documentation. | |
| Header “...” | Add the specific header to all your code files. Click and enter the header text in the Header dialog. You can also define $DATE, $AUTHOR, and $TIME in the header. Since MagicDraw version 17.0, the variable $DOCUMENTATION can be used to export the documentation of the file component (from the File View package) as a header of the IDL file. Functionality Availability The variable $DOCUMENTATION is available with MagicDraw 17.0 Service Pack 4 and later versions. | |
| Set Include Path | Specify the path for the #include directives. Click to open the Select Folder dialog box. | |
| DDL Language Options | Generate opening bracket in new line | Opens a bracket in the newly generated line. |
| Generate spaces | Spaces inside an assignment and other operators are generated. | |
| Generate documentation | Comment brackets are placed in your code, unless the class in the model has no documentation. | |
Header | Add the specific header to all your code files. Click the button and enter header text in the Header dialog. You may also define $DATE, $AUTHOR, and $TIME in the header. | |
| C# Language Options | Generate opening bracket in new line | Opens a bracket in the newly generated line. |
| Generate spaces | Generates spaces inside an assignment and other operators. | |
| Generate empty documentation | Comment brackets are placed in your code, unless the class in the model has no documentation. | |
| Generate required "using" directives | Automatic generation of "using" directives. This option facilitates the usage of namespaces and types defined in other namespaces. | |
| Concatenate namespace names | If not selected, namespace names are separated into several lines, e.g. namespace A {namespace B { | |
Documentation:
|
| |
| Header | Adds the specific header to all your code files. Click and type the header text in the Header dialog box. You can also define $DATE, $AUTHOR, and $TIME in the header. | |
| Conditional Symbols | Add the conditional symbols which cannot be recognized and should be skipped during reverse. Click the '...' button and add conditional symbols in the Define Conditional Symbols dialog box. |

