We will demonstrate the recommended step-by-step instructions on how to customize an element, how to begin to create customization, how to create customization data, and how the customization data will be represented on the DSL element.
- Create a new project and name it Organization_Stereotypes.mdzip.
Create a Profile element and name it Stereotypes.
Stereotypes
The purpose of the Profile named Stereotypes is to store all the stereotypes. Later we will share the package in order to use the stereotypes in the customization project.
In the Profile element, create a Profile Diagram and name it Stereotypes.
The Profile Diagram palette contains all the necessary buttons for the customization creation.
In the Profile Diagram, create a Stereotype element and name it Company.
Apply the Class metaclass to the Company Stereotype.

You can see how customization rules will be passed to the DSL element by using the stereotype.
We selected the Class metaclass, because the «Company» stereotype will be applied to a class element. In other words, the type of the DSL element will be the class.
You can also assign an icon to the stereotype. The icon will be represented on the DSL element.
Share the stereotypes package. The Organization_Stereotypes.mdzip project becomes a shared project.
Only the content of the shared stereotypes package will be visible in the project that will use the project.
Save the Organization_Stereotypes.mdzip project.
Create a new project and name it Organization_Customizations.mdzip.
Create a Profile element and name it Customizations.
The purpose of the Customizations package is to store all the customization data. Later we will share the package.
In the Profile element, create a Profile Diagram and name it Customizations.
The Customizations diagram is intended for customization elements creation.
In the Profile Diagram, create a customization element and name it Company.
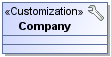
On a diagram, you can see that the customization element is a class with the applied «Customization» stereotype.
Use the Organization_Stereotypes.mdzip project in the current project.
Open the Company customization element Specification window, under the General category, click the Customization Target property and then specify the Company stereotype.
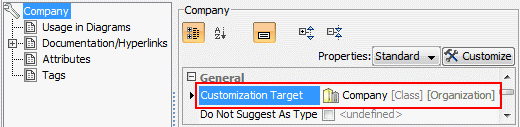
To assign a customization target quickly, select the Company stereotype in the Model Browser and drag it to the shape of the Company customization element on the diagram pane.
In the Customization Specification window, you can specify customization data that will be passed to the DSL element.
In the Company customization element Specification window, under the General category, set the Hide Metatype check box to true. If the value is true, the element acts like a new standard element type in the modeling tool.
In the Company customization element Specification window, under the Owned Elements category, click the Possible Owners property and then select the Package metaclass.
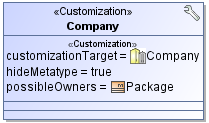
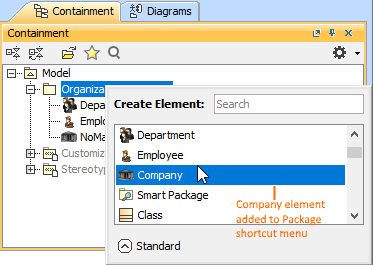
The DSL element will be added to the package shortcut menu, under the Create Element command.
Share the Customizations package. The Organization_Customizations.mdzip project with the shared Customizations package becomes a shared project.
Save the Organization_Customizations.mdzip project.
Create a project and name it Organization.
Use the Organization_Customizations.mdzip project in the Organization project.
The Organization_Stereotypes.mdzip project will be used in the Organization project automatically, because the Organization_Customizations.mdzip project uses the Organization_Stereotypes.mdzip project.
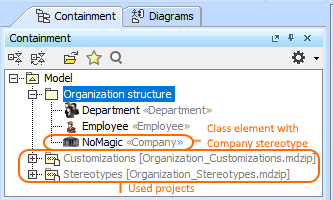
In the Organization project, create a Package and in that package, create a class element and name it NoMagic.
Apply the Company stereotype to the NoMagic class element.
- Save and reopen the project.
If you modify the customization element and/or stereotype, make sure to reopen projects that use it.
Structure of a project that use other projects
In this example, the «Company» stereotype is applied to the NoMagic class element. You can see that the Company element is added to the package shortcut menu.
Example of the “Possible Owner” property realization
Create Element
If you do not want the new DSL element to appear on the Create Element menu, you can hide the appropriate command when customizing your modeling tool perspective.