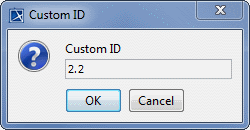
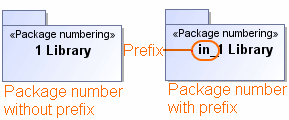
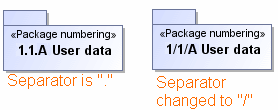
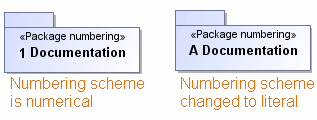
Using the manual numbering, you can:

  • Set the ID for one or more elements.
  • Increase, decrease, or change a number for an element.
  • Add a prefix for the element number.
  • Change a numbering format.
  • Update the last ID.


To number the element


  1. On the selected element’s shortcut menu, click Element Numbering. The Element Numbering dialog opens.
  2. In the element list on the right side of the dialog, select an element you want to number.
  3. Click Create.

To change the element’s numbering symbol


  1. Open the selected element’s shortcut menu and click Element Numbering. The Element Numbering dialog opens.
  2. Click the Edit button.

    • If you need to change just the last number of the element ID, click Edit. The Edit ID dialog opens.
      Edit ID dialog

      You can enter only the number, if the selected element’s numbering value is numerical.
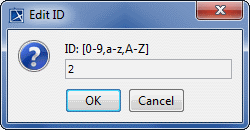
      You can enter only a new literal symbol, if the selected element’s numbering value is a literal symbol.

    • If you need to change the whole element ID (including the prefix), click Set Custom ID. The Custom ID dialog opens.

      Set Custom ID dialog

  3. Enter a new numbering symbol.

  4. Click OK.


To remove the element’s number


  1. Open the selected element’s shortcut menu and click Element Numbering. The Element Numbering dialog opens.
  2. Select the element from which you want to remove the number and click the Remove button.
  3. You can select either to remove the number only from the selected element or to remove numbers from all elements owned by the selected elements. Do one of the following:

    • Click the Remove button. Only the selected element’s number is removed.
    • Click the Remove Recursively button. Numbers are removed from the selected element and all elements owned by the selected element.

  4. Click OK when you are done.

To increase the element number


  1. Open the selected element’s shortcut menu and click Element Numbering. The Element Numbering dialog opens.
  2. Select the element which number you want to increase.
  3. Click the Increase button. The element number is increased by one.
  4. Click OK when you are done.


To decrease the element number


  1. Open the selected element’s shortcut menu and select Element Numbering. The Element Numbering dialog opens.
  2. Select the element which number you want to decrease.
  3. Click the Decrease button. The element number is decreased by one.

    The Decrease button is available, when the selected element’s number is not the first in the list.

  4. Click OK when you are done.


To renumber the elements


  1. On the selected element’s shortcut menu, click Element Numbering. The Element Numbering dialog opens.
  2. Click Details to extent the dialog with the renumbering commands.
  3. You can select either to renumber only elements listed in the element list or to renumber elements listed in the element list including their owning elements. Do one of the following:

    • Click the Renumber button. All the elements in the elements list are renumbered successively.

    • Click the Renumber Recursively button. All the elements and elements owned by the selected element are renumbered successively.

  4.  Click OK when you are done.

If the Renumber from Initial Value is selected, the whole element number changes. Otherwise just the number of the selected level changes.


To add a prefix to the element number


  1. On the element owner’s shortcut menu, select Element Numbering. The Element Numbering dialog opens.
  2. In the Prefix column, click the appropriate cell (according to the used numbering property and numbering scheme). 
  3. Type the prefix. It can be any symbol.
  4. Click OK.

The following example illustrates how numbers with prefixes and without prefixes are depicted on the element shape.

Numbers with and without prefix.


To change a separator in the element number


  1. Open the element owner’s shortcut menu and click Element Numbering. The Element Numbering dialog opens.
  2. In the Separator column, click the appropriate cell (according to the used numbering property and numbering scheme).
  3. Type the separator symbol.

    A new separator will override the earlier predefined separator.

  4. Click OK.

The following example illustrates the number separator changing from “.” to “/”.

Numbering separators


To change a numbering scheme


  1. On the selected element’s shortcut menu, click Element Numbering. The Element Numbering dialog opens.
  2. In the appropriate Numbered property row, click the Numbering Scheme cell to open the list of the defined numbering schemes.
  3. Select the desired numbering scheme in that list.
  4. Click OK.

When you change the numbering scheme for the selected element, the new numbering scheme is applied to all elements owned by the selected element.


The following example illustrates how numbers are depicted on the element shape after changing the numbering scheme from numerical to literal.

Changing numbering scheme


To update the last ID


  1. Right-click an element numbered in the sequence, whose last ID you want to update.
  2. From the shortcut menu, select Element Numbering. The appropriate dialog opens.
  3. Click Details and then click the Update Last ID button.
  4. Wait while the message informs you that the last ID is set to the particular value. This value is the highest ID in the sequence.
  5. Click OK to close the Element Numbering dialog.

As a result, all subsequently created elements are numbered continuing from the the highest ID. This is especially useful after you delete one or more elements from the end of the numbered sequence. In such cases, the last ID remains higher than it is expected to be, causing a numbering gap in the sequence. Updating the last ID prevents the emergence of that gap.

However, if a numbering gap is not at the end of the sequence, it remains even after the update of the last ID.

For better understanding the functionality, let's study a few cases.

  1. If you have a sequence from 1 to 5, and delete elements with ID = 4 and ID = 5, the ID of a subsequently created element by default is 6. But if you update the last ID in advance, the one of the subsequently created element is 4 as it should be.
  2. If you have a sequence from 1 to 3 and from 5 to 6, the last ID after the update is 6. As you can see, ID = 4 is skipped, because it isn't the highest ID in the sequence; the highest ID is 6.