On this page
Start the merge using either of the following:
- From Collaborate > Merge From:
You can apply this method of starting a merge exclusively to Teamwork Cloud projects. For Teamwork Cloud projects, you do not need to specify the ancestor; it will be instantly identified after the source is selected. By default, the lowest common parent of two branches is considered a common ancestor.
- From Tools > Project Merge.
You can apply this method of starting a merge to both local and Teamwork Cloud projects, although used projects can be included in a merge only for server projects. You must specify both the source and the ancestor, and manually choose the 3-way or 2-way merge.
- For Teamwork Cloud projects, the modeling tool automatically applies the 3-way merge, as a merge is only available between project versions from different branches.
- Partial locking of a project occurs when merging changes of a project in the Teamwork Cloud. Only changed/updated and merging elements are locked in the project, not the whole project. Thus, actions with other server project elements are not interrupted for other users by locking and merging activities.
- While the merge is in process in a server project on the Teamwork Cloud server, other users will not be able to commit project changes to the server, as it will be unavailable.
Conflicting changes detected during merge are automatically resolved by accepting changes either from the Source or the Target version. To specify a contributor, go to Options > Environment > General > Merge and Compare and then next to Automatically Resolve Conflicts by Choosing, select either Target or Source.
Local model merge
To start merge from Tools > Project Merge
- Open a project that will be the target .
- From the Tools menu, select Project Merge. The Merge Projects dialog will open within the active project selected as the target.
Select the type of merge.
Learn about 3-way and 2-way merge in Choosing merge type .
- Select a project that will be the source.
- If you selected 3-way merge, choose a project that will be the ancestor.
- Click the
 Advanced button to see more merge options. Otherwise, go to step #8.
 - In the Optimize for drop-down list, select either:
- Speed, to merge the projects faster. This will require more memory.
Memory, to decrease memory usage while merging the projects if your computer does not have enough memory. This will use less memory but at the same time will slow down the merge procedure when the project has many changes in diagrams. It will not include the differing diagrams/elements count. If you need that information, select optimize for Speed.
You can also specify the Optimize for option in the Environment Options dialog. Find this option under the Merge and Compare category in the General options group.
If the Low memory notification keeps popping up during merge, we recommend that you do one of the following:
- increase the amount of memory allocated for the modeling tool
- optimize Merge and Compare for Memory
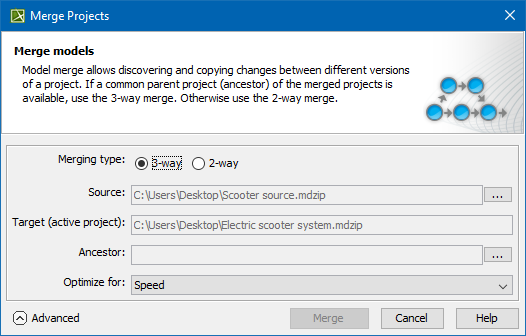
Click the Merge button. The project merge will start. If changes are found, the Merge window will open. Proceed to Analyzing and managing merge results.
Model merge for Teamwork Cloud
To start a merge of the from Collaborate > Merge From
- Open a server project that will be the target.
- From the Collaborate menu, select Merge From.
- In the opened dialog, select a server project that will be the source.
- Click the OK button. The question message illustrated below appears.
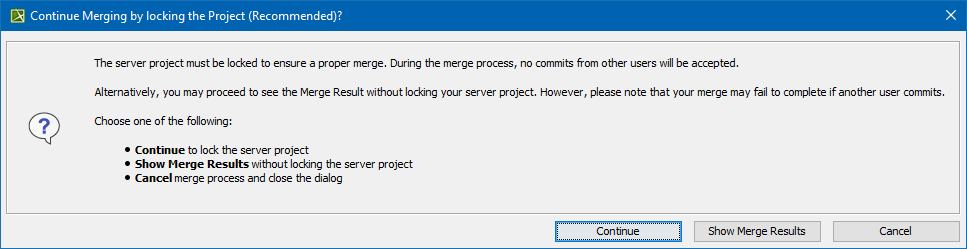
Do one of the following:
Click Continue to lock the server project. Other users will not be able to commit changes.
Click Show Merge Results to proceed directly to the Merge Results, without locking the server project.
- Click Cancel merge process and close the dialog.
- The project merge will start. If changes are found, the Merge window will open.
- Proceed to Analyzing and managing merge results.
In this case, Lowest Common Parent is considered a common ancestor by default.
To start merge from Tools > Project Merge
- Open a project that will be the target .
- From the Tools menu, select Project Merge. The Merge Projects dialog will open within the active project selected as the target.
Select a project that will be the source.
- Click the
 Advanced button to see more merge options. Otherwise, go to step #7 .
 - In the Ancestor drop-down list, select either:
- Lowest Common Parent to select the lowest common ancestor according to graph logic during the project merge.
- Branch Point to select the version the branch was created from during the project merge.
- In the Optimize for drop-down list, select either:
- Speed, to merge the projects faster. This will require more memory.
Memory, to decrease memory usage while merging the projects if your computer does not have enough memory. This will use less memory but at the same time will slow down the merge procedure when the project has many changes in diagrams. It will not include the differing diagrams/elements count. If you need that information, select optimize for Speed.
You can also specify the Optimize for option in the Environment Options dialog. Find this option under the Merge and Compare category in the General options group.
If the Low memory notification keeps popping up during merge, we recommend that you do one of the following:
- increase the amount of memory allocated for the modeling tool
- optimize Merge and Compare for Memory
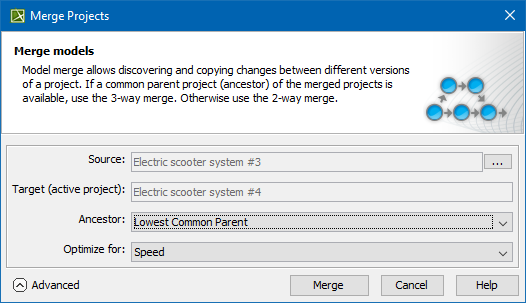
- Click the Merge button. The question message illustrated in the previous section will appear.
Do one of the following:
Click Continue to lock the server project and continue the merge process. Other users will not be able to commit changes.
Click Show Merge Results to proceed directly to the Merge Results.
The project merge will start. If changes are found, the Merge window will open. Proceed to Analyzing and managing merge results.