You can create a generic table by any of the methods described in creating any diagram in MagicDraw.
When creating a Generic Table you should specify the following:
- Denote the name of the table and the owner package (MANDATORY).
- Define element types that will be used in the table (MANDATORY).
- Select elements corresponding to the element types (OPTIONAL).
- Specify table columns (OPTIONAL). Columns represent element properties, so the table creation could be finished without specifying columns.
You can modify the table after it is created.
This section describes several of the most popular ways of creating a generic table:
Creating a generic table without using a wizard
Once created, the table can be filled with data using the generic table environment capabilities.
To create a Generic Table without using a wizard
- In the Containment tree, select an element to be the owner of the Generic Table.
- Do one of the following:
- From the main menu, select Diagrams > Create Diagram. Type “gen” and press Enter.
- On the main toolbars, click the Create Diagram button. Type “gen” and press Enter.
- Press Ctrl+N. Type “gen” and press Enter.
- Right-click the element and from the shortcut menu select Create Diagram > Other Diagrams > Generic Table.
The newly created Generic Table opens on the right side of the application window.
- Type the name of the table.
- Select element types.

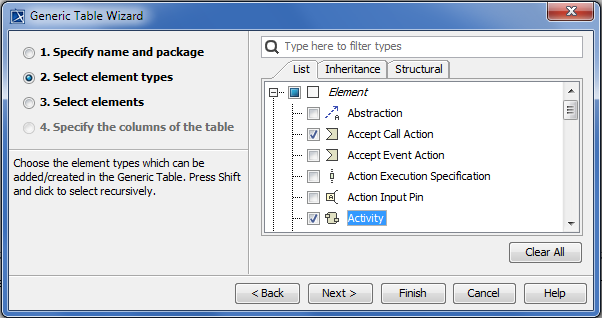
Select desired element types and/or stereotypes in the Select Element Types dialog. The Element Type box in the Criteria area of the Generic Table will display the selected items. This action is optional, so you can continue the creation without selecting any type or stereotype. You will be able to modify selected element types when the Generic Table is created.
If you drag an element from the Containment tree to the table, the type of this element will be automatically set as the Element Type box value.
- Fill the table with elements:
Specify the scope, from which the elements should be added to the table. All the elements created in that particular scope will be automatically added to the table.
If the contents of the table have not been updated, try the following:
- Click
 on the View toolbar, in case a smart package is specified as the scope criteria.
 - Make sure the specified scope contains elements that are specified in the Element Type box. Element types must correspond to the selected element types!
- Make sure at least one element type is specified for the table.
- Click
- Create new elements directly from the table. How to craete new elements >>
- Copy and paste elements from another resource. How to paste elements >>
Add existing elements to the table individually. How to add existing elements >>
Creating a Generic Table using the diagram creation wizard
Once created the table is already filled with data.
To create a Generic Table using the diagram creation wizard
- Open the Generic Table Wizard dialog in one of the following ways:
- On the Diagrams menu, click Diagram Wizards > Generic Table Wizard.
- On the Analyze menu, click Model Visualizer.
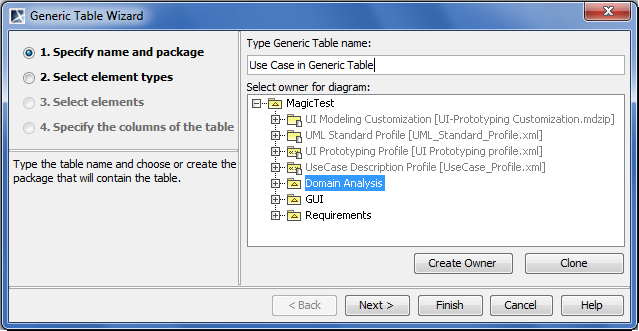
- Type the name of the table and select the owner for it.
- Select element types (see details in the preceding procedure).
Select elements.
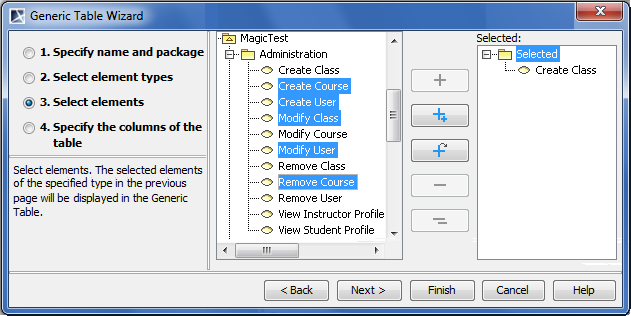
Select elements from the model tree and add them into the Selected list.Though you can select any element from the Model Browser, only the elements of selected types will be added into the Generic Table.
If the Generic Table creation wizard is opened from one or more elements’ shortcut menu, the element or the set of elements will be added to the Selected list automatically.For more information about the element selection and dialog buttons, see Elements multiple selection.
- Specify the set of columns to show on the table.
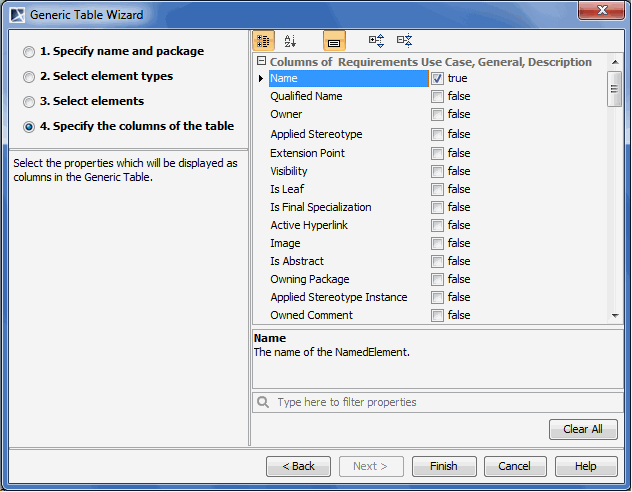
The list of all available properties corresponding to selected element types is presented in the dialog. If selected element types have tags, they are also displayed in the list. All selected properties will be displayed as columns in the Generic Table. The Name property is selected automatically; all other properties should be selected by the user.
Select properties you need to see as columns to finish the table.
Creating a Generic Table for a set of selected elements using the diagram creation wizard
Note that element types, elements, and columns of the Generic Table will be automatically selected according to the set of selected elements.
To create a new Generic Table for a set of selected elements
- Select a set of elements you want to add to the Generic Table.
- From the shortcut menu select Tools > Generic Table Wizard.
- Follow the steps described in Creating a Generic Table with help of the diagram creation wizard but note that element types, elements, and columns will be automatically selected according to the set of selected elements.