On this page
Systems Modeling Language (SysML) is used to capture systems design as descriptive and analytical system models, which relate text requirements to the design and provide a baseline to support analysis and verification. With the system parameter calculated, you can verify the system requirement and decide whether it is satisfied or not. The modeling tool enables you to perform this verification automatically.
Getting ready for automated Requirements verification
Before performing the automatic Requirements verification, you need to get ready.
To get ready for automated Requirements verification
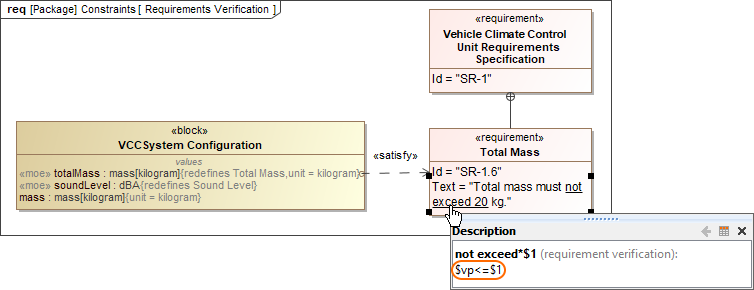
- Define the constraint in the Requirement text.
Create a Satisfy relationship from the Value Property to the Requirement.
The Value Property captures the system parameter whose value determines whether the system requirement is satisfied or not.
Do one of the following:
If the Underline Patterns in Requirement Text option is enabled, the condition pattern in the Requirement text is underlined. Move the mouse pointer over it to see the expression in the tooltip. If it is correct, you are ready to perform the automatic Requirement verification.
- If the expression in the tooltip is not correct, do the following:
- Perform either of the two options:
- Right-click a value property in the compartment area of the element shape.
- Right-click the Requirement.
- Select Tools > Extract Constraint Block From Requirement to automatically create a Constraint Block.
- You can modify the constraint expression and the parameters as needed (see Figure A below).
- Perform either of the two options:
You are now ready to perform the automatic Requirement verification.
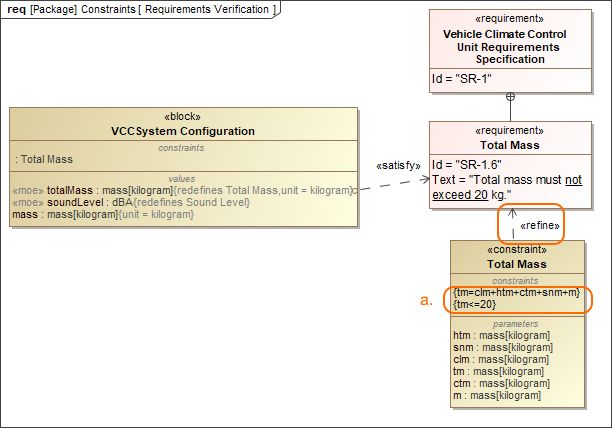
In the example above, a Constraint Block with the constraint {totalMass <= 20} and the constraint parameters is automatically created. The constraint expression is then modified to {tm=clm+html+ctm+snm+m}{tm<=20}.
Performing automated Requirements verification in Requirement Table
The automated Requirements verification analysis can be done directly in the Requirement Table. The analysis is performed by evaluating whether the value of the property that satisfies the Requirement falls within a range of upper and lower bounds that are extracted from the Requirement text. Additionally, the automatically calculated margin value helps to determine how close the system model is to fulfilling Requirements.
To perform automated Requirements verification
- Create a Requirement Table. You can also use an existing Requirement Table.
- Specify the scope for the table.
Set the context element (i.e., a Block as the table context) to perform the context-specific analysis.
The Requirement Table with the Property, Bounds, Value, and Margin columns is created, and passing/failing Requirements are marked (see an image below).
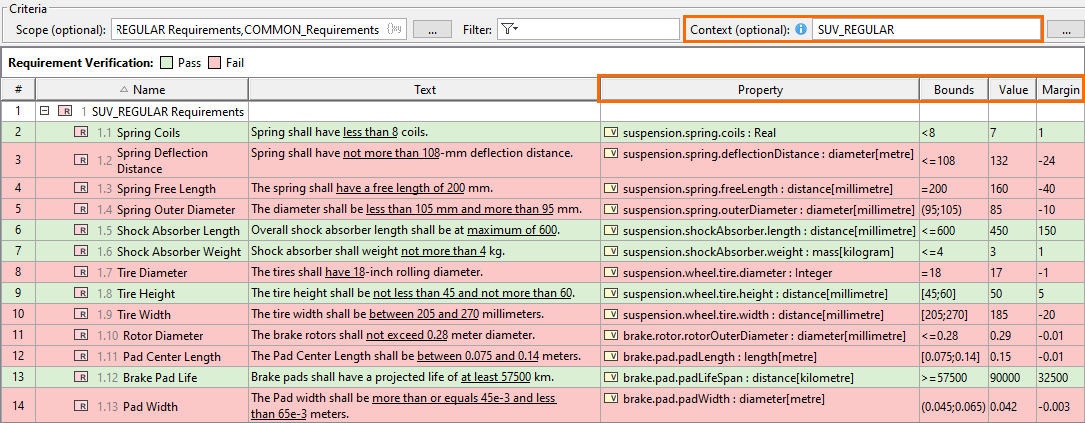
Using the Requirement patterns mechanism, the constraint extracted from the Requirement text is shown in the Bounds column. The Value column shows the initial value (if it exists) or the default value of the Value Property. Finally, the Margin column displays the difference between the calculated and required values.
Verification context in tables
- If the table context is left unspecified, properties satisfying the Requirements are collected from the entire model.
- When the table context is specified, the Requirement Verification Legend and the verification-specific columns are displayed in the table if they were not before:
- Property - the Value Property that satisfies the Requirement.
- Bounds - lower and upper bounds of the required value extracted from the Requirement text.
- Value - the calculated value (default value or initial value) of the property that satisfies the Requirement.
- Margin - the difference between the calculated value and the required value.
- Property - the Value Property that satisfies the Requirement.
Requirements verification limitations
Table context specification limits
The table context should be specified with a Block that is recursively composed of no more than 10,000 parts. Otherwise, the Property, Value, and Margin columns are displayed as empty, and the verification analysis is not performed. In such a case, error icons are displayed in the column headers (see image below).![]()
Requirements refined by Constraint Blocks
The Requirements Verification analysis in the Requirement Table considers constraints extracted directly from the Requirement text only, meaning that the analysis cannot be performed for Requirements refined by Constraint Blocks.
Simulation configuration option
If an Instance is defined as the Requirement Table context, the Requirements verification analysis does not consider the Simulation configuration option Remember Failure Status .
Performing automated Requirements verification in Instance Table
You can also carry out Requirements verification analysis in an Instance table. While the verification in a Requirement table allows you to perform the analysis for a single instance set as the context, the verification in an Instance table allows you to perform the analysis for multiple instances at once via the Enable Patterns-Based Verification option. In an Instance table, the columns represent the properties provided by the classifier specified for the table, and the appropriate cells display the property values specified in the instances you choose to display in the table.
To perform automated Requirements verification in Instance Table
- Create an Instance Table.
- Specify the classifier for the table (i.e., the Block containing the properties satisfying the requirements).
- Set the scope for the table or add individual instances to the table.
- Select the properties to be displayed in table columns.
- In the table toolbar, click the Options button
 and select Enable Patterns-Based Verification to enable the verification.
The Instance table displays the selected instances and performs the verification, which is visible via the highlighted cells based on their verification status (definition is specified in the Legend).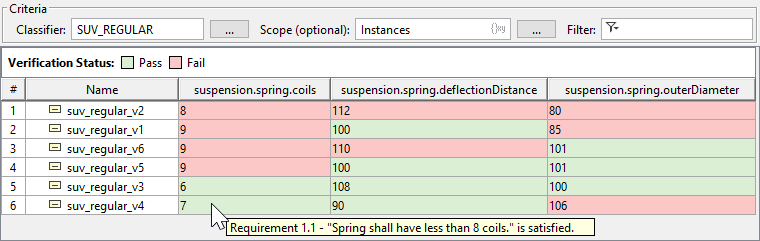
Performing automated Requirements verification using simulation
With the help of simulation, you can perform automatic Requirements verification.
To perform automatic Requirements verification, you must have the Cameo Simulation Toolkit installed. How to install >>
To perform automatic Requirements verification using simulation
- Right-click the Block, which contains the Value Property.
- From the shortcut menu, select Simulation > Run.
In the Question dialog, click Yes to load the validation rules and validate the model before the simulation or No to simulate the model without validating it.
- In the Simulation window, click
 or press F8 to start the simulation.
The result indicating whether or not the value is satisfied is shown in the Variables pane. In the following figure, you can see when the Requirement is not satisfied (highlighted in red) and satisfied (highlighted in green). You can change the value directly in the Value cell, and the Requirement constraint is checked automatically.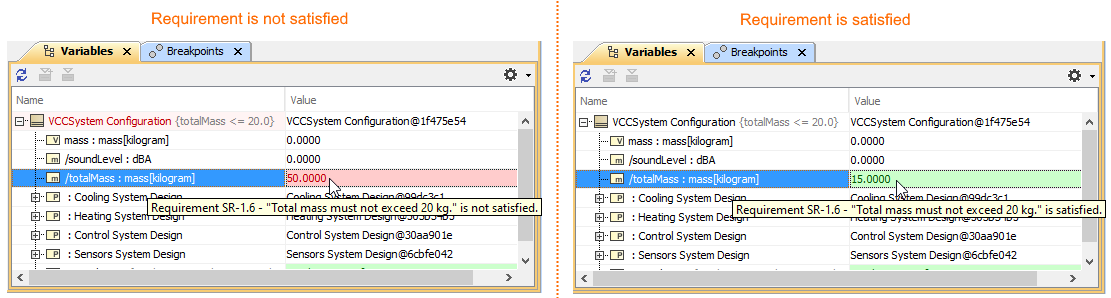
Additional features of Cameo Simulation Toolkit