Projects can be added to Teamwork Server in one of the following ways:
- By creating a project in Teamwork Server from scratch
- By adding a local project to Teamwork Server
- By creating server projects in IDE integration
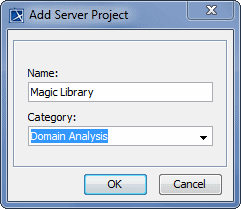
To create a project in Teamwork Server from scratch
- From the Collaborate menu, choose Projects.
- Click the Add button. The Add Server Project dialog opens.
- Type a new project name.
- Either select an existing category or type a new category name.
- Click OK.
To add a local project to Teamwork Server
Open the project you want to add to Teamwork Server.
From the Collaborate menu, choose Add Project to Server. The Add Project to the Server dialog opens.
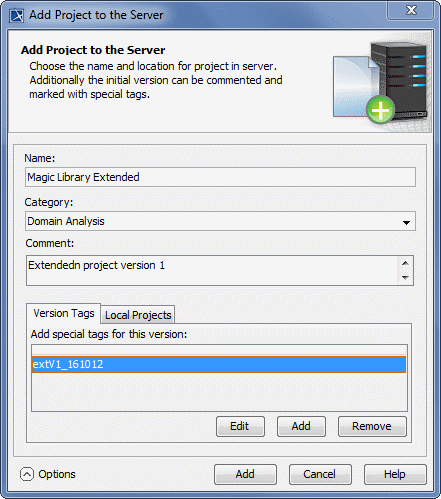
Enter a different project name for Teamwork Server, if needed.
Either select an existing category or type a new category name.
Type your comments.
Click Options if you need to enter more details about the project. The dialog extends with the Version Tags and Local Projects tabs.
- To add a tag, click Add. The Enter Tag dialog appears, where you can type the tag for your project version.
- If your project uses local projects, the Local Projects tab lists all those projects used in the project you are adding to the server. You can change used projects' names on the Server. From the Action drop-down list, select what you want to do with local used projects when adding a project to Teamwork Server:
- Add to Server adds the entire selected used project to Teamwork Server. Select a used project name on the server from the Name on Server drop-down list or type a new one.
Leave as Local Project leaves the selected used project on a local workstation.
Standard profiles provided by the modeling tool can take only this action.
- Use Server Project uses a local used project or its branch from Teamwork Server. You can select the entire used project (trunk) or a branch.
Click the Add button.
Watch this demo to see how to add projects to Teamwork Server.
To create server projects in IDE integration
- Start a new project in the IDE integration you are working on. The New Project Wizard dialog opens.
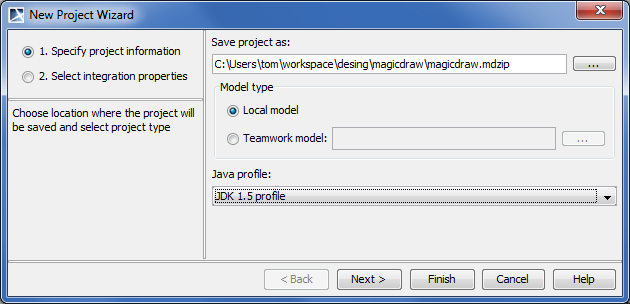
Select Teamwork model and click the
 button to login to Teamwork Server.
After log in, select an existing project or add a new one. The model from the IDE source will be updated in the selected project. Click Next.
Specify integration properties and click Finish. The server project opens in the modeling tool.