The CATIA FLXML Exporter plugin allows you to transform a UML/SysML/UAF model to functional and logical structures supported in the 3DEXPERIENCE platform. The plugin uses the FLXML Generation Engine and the element transformation schema to generate an FLXM file from the selected model elements. The conversion of CATIA Magic data to 3DEXPERIENCE platform data with lifecycle management is based on element mapping.
You can later import the generated FLXML file to the 3DEXPERIENCE platform while ensuring the digital continuity and master interfaces of system architecture (with sub-systems developed in 3DEXPERIENCE Platform, CATIA Magic, or other tools). The CATIA FLXM Exporter plugin also helps to initiate the transition from the conceptual to the design layer.
For detailed information about the CATIA FLXML Exporter plugin, see CATIA FLXML Exporter Plugin User Guide.pdf
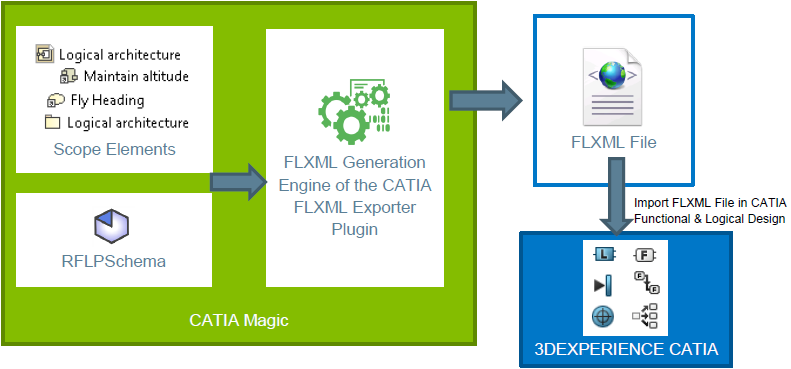
The schema displaying how the CATIA FLXML Exporter plugin works.
Using the CATIA FLXML Exporter plugin ensures the digital continuity and master interfaces of the system architecture.
Prerequisites
To be able to export the selected part of a model to an FLXML file, you need to install the CATIA FLXML Exporter Plugin in your modeling tool. It is a no-cost plugin, and you can download it from the 3DEXPERIENCE download page.
To export a model to an FLXML file
- In the main menu of a modeling tool, go to 3DEXPERIENCE > CATIA FLXML Exporter > Generate FLXML. The CATIA FLXML Exporter dialog opens.
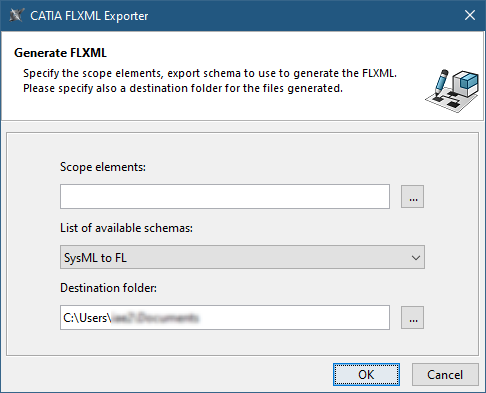
- In the open dialog, click
 next to the Scope elements box and select the scope of elements to be included in the generated FLXML file:
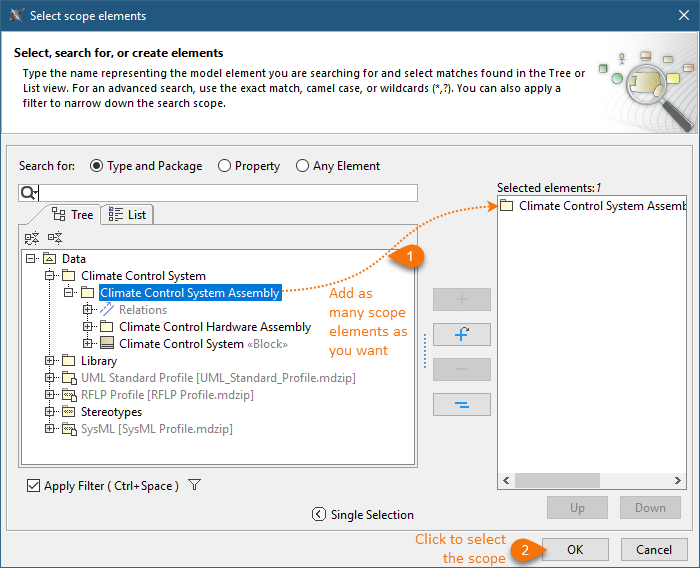
- In the Tree view of the Select scope elements dialog, select the elements you want to export. (Press and hold the Ctrl key to select multiple elements.)
- Click
 to add the elements to the Selected elements list.
 - Click OK to close the dialog.
By default, all elements owned by the selected scope element are included when generating an FLXML file.
If the selected scope element is a diagram, the scope of the FLXML file generation will be the elements displayed in the diagram.
If a certain element type is not included in the default element mapping schema, the elements of this type are excluded when generating an FLXML file.
- In the List of available schemas box, select the default SysML to FL schema or a custom schema.
- Click next to the Destination folder box and select the folder where the generated FLXML file should be stored.
- Click OK.
- If you get the message saying that some validation errors were found, do one of the following:
- Click Yes to ignore the validation errors and generate an FLXML file anyway.
- Click No to correct the errors in the open validation results panel. Then try exporting your model to an FLXML file again.
After completing the above steps, an FLXML file is generated for the selected scope of a model and saved in the destination folder.
Additional resources