On this page
Introduction
The Validation dialog allows you to limit the scope of the constraints to validate against your model. Since the active validation suites check your model all the time, the validation according predefined validation suites must be started by using this dialog. If you select the All Validation Suite as the Validation Suite in the Validation dialog, your model is validated against all predefined and active validation suites at the same time. To limit the scope of the constraints to be validated against, select a more specific validation suite, such as Numbering Validation. The model or its part will be validated against the selected validation suite only. The Validation Results panel shows the results, listing all elements that do not conform to some constraints (invalid elements) in the selected validation suite.
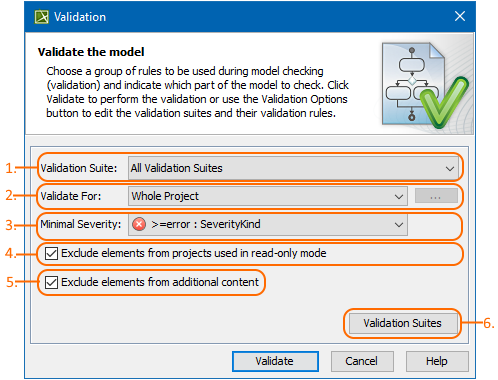
The Validation dialog. Its options (1,2,3,4,5) are described below.
Opening the Validation dialog
To open the Validation dialog
- Do one of the following:
- On the main menu, select Analyze > Validation > Validate.
- On the Validation toolbar, click . - In the Validation dialog, specify the options. Descriptions of options >>
- Click Validate.
The model or its part is validated against the selected validation suite. The results are shown in the Validation Results panel.
You can run the validation for the entire diagram, table, matrix, relation map, or elements. Learn how to start the validation >>
Description of Validation dialog options
The Validation dialog consists of the following:
The Validation Suite drop-down list (#1 in the image above) allows you to select a validation suite that you want to validate the model or its part against.
The list of available validation suites depends on the open project; the validation suites and validation rules are stored in the model as regular model elements.
- The Validate For drop-down list (#2 in the image above) allows you to choose:
Whole Project to run validation on the entire model.
Validation Selection to run validation on special packages and/or elements. Then click the ... button and select the scope for validation.
Validation is always recursive. If you select a package for validation, you do not need to select its inner elements.
- The Minimal Severity drop-down list (#3 in the image above) allows you to select the minimal severity level: debug, info, warning, error, fatal. Debug is the lowest possible severity level.
- Clear the Exclude elements from projects used in read-only mode check box (#4 in the image above) if you want to run validation on the elements stored in the read-only project usages.
- Clear the Exclude elements from additional content check box (#5 in the image above) if you want to include the content of Smart Packages while running the passive validation.
- The Validation Suites button (#6 in the image above) opens the Validation Suites dialog.

