Introduction
The SysML active validation suites enable you to see if a model is correct and complete immediately. It instantly displays any errors in the model and suggests appropriate solutions. The active validation suites have «activeValidationSuite» stereotype applied.
Each profile contains its own active validation suites. You can create your own validation suites.
You can meet the following active validation suites in the Validation dialog or Validation Suites dialog:
- SysML_activeValSuite - Activities contains SysML constraints on the following elements: Discrete and noBuffer.
- SysML_activeValSuite - Blocks contains SysML constraints on the following elements: Binding Connector, Block, Distributed Property and Value Type.
- SysML_activeValSuite - Constraint Blocks contains SysML constraints on the following elements: Constraint Block and Constraint Property.
- SysML_activeValSuite - Non-normative Extensions contains SysML constraints on the following elements: nonStreaming, Streaming, Design Constraint, Functional Requirement, Interface Requirement and Performance Requirement.
- SysML_activeValSuite - Port and Flows contains SysML constraints on the following elements: Flow Port, Flow Property, Flow Specification and Item Flow.
- SysML_activeValSuite - Requirements contains SysML constraints on the following elements: Copy, Requirement and Test Case.
You can find active validation suites in the Containment tree when the Show Auxiliary Resources option is enabled, expand the MD Customization for SysML Package> SysML constraints Package > SysML activeValSuite package. The SysML activeValSuite Package is divided into separate Packages and contain an appropriate validation rules.
To show the auxiliary resources
- In the Model Browser, click
 and enable the Show Auxiliary Resources option.
Validating a project with active validation suites
To manually validate project with active validation suites, you can select the specific Active ValSuite (mentioned above) as the Validation Suite in the Validation dialog. How to start the validation >>
Selecting active validation mode
Active validation automatically runs in the background according to the selected active validation mode.
To select the active validation mode
- Do one of the following:
- On the main menu, select Analyze > Validation > Active Validation.
- On the main menu, select Options > Environment. On the left of the Environment Options dialog, select Active Validation group. Select the Active Validation option.
- Select one of the following modes:
- All - enables all (user defined and system) active validation suites.
System - enables validation suites that are critical to the model. For example, all projects have the UML Standard Profile, which has the Composition Integrity system validation suite. This suite contains validation rules allowing for detecting shared project usage, recovered element, or illegal reference related problems.
Info
You can check these rules under the Auxiliary Resources > UML Standard Profile > Validation Profile > Composition Integrity.
To show the auxiliary resources
- In the Model Browser, click and enable the Show Auxiliary Resources option.
- In the Model Browser, click
- Click OK.
Selected validation suites are active for all projects, not just the current project.
Specifying the active validation period
You can control how often, in seconds, a modeling tool will analyze the rules to be executed and how often the modeling tool will execute these rules. After opening a project, all required validation rules will be executed, including system or all (user and system), and next time these rules will be checked only after the specified period.
To specify the active validation period
- On the main menu, select Options > Environment.
- On the left of the Environment Options dialog, select Active Validation group.
- Select the Active Validation Period (seconds) option.
Type its value in seconds.
Specify a higher time period to ensure better performance of the application.
Click OK.
The specified period is used for all projects, not just the current project.
Customizing active validation options
You can customize the Active Validation options in the Project Options dialog.
To open the Active Validation options
- Open the Project Options dialog in one of the following ways:
- On the main menu, select Analyze > Validation > Active Validation Options.
- On the main menu, select Options > Project. In the Project Options dialog, select General > Validation.
- Specify the options you need in the Active Validation area. How to use the Project Options dialog >>
- Click OK.
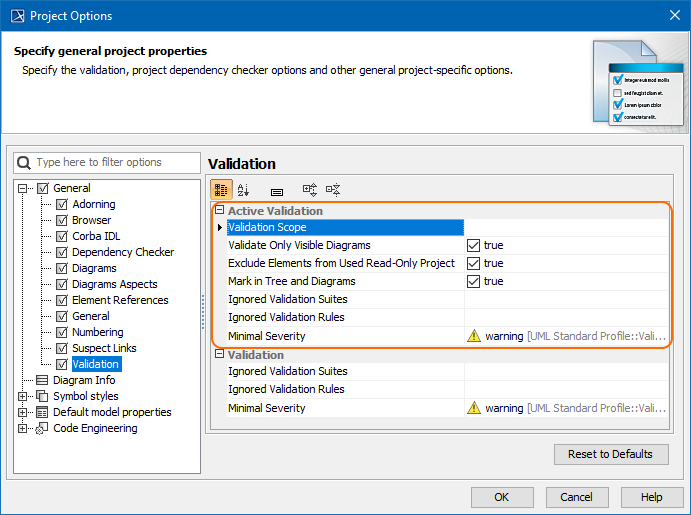
Active Validation options in the Project Options dialog.
Optimizing performance
- Set the Validate Only Visible Diagrams option value to true. This limits a validation scope to visible diagrams only.
- Set the Exclude Elements from Used Read-Only Project option value to true to reduce the number of elements to check in your model.
Smart package content (separate elements) will be validated only if Smart package is set directly as a scope of the active validation.
If smart package is set indirectly for the validation scope, modeling tool will automatically exclude it from the active validation scope, because elements in the smart package are owned by other elements.
Turning off the parameters synchronization
To turn off the parameters synchronization
- On the main menu, select Options > Project.
- In the Project Options dialog, select General > General.
- Find the Synchronize Parameters and Arguments option and set its value to false.
Related pages