On this page
The scope of a role in Teamwork Cloud is the extent of the area to which the role is relevant. There are two scopes of roles: global scope and custom scope. A role with global scope is not limited to any resource or category and applies to all resources in the server. A role with a custom scope applies only to specific resources, project branches, and/or categories.
Setting role scopes
To change the scope of roles, you need to have the Manage User Permissions permission.
Global scope
The permissions of a role with a global scope extend across all resources, protected objects, and users in Teamwork Cloud. When you assign a role to a user or user group, its scope is set to global by default, but you can change that scope to custom at any time. Most roles in Teamwork Cloud can have either a global or a custom scope. However, some roles can only be global because of the nature of their permissions. For example, a user with the User Manager role does not need and cannot have a custom scope (resource assignment). Such user is authorized to carry out their tasks related to this role anywhere in the Teamwork Cloud server.
The following table lists all default Teamwork Cloud roles that can have only a global scope:
| Global scope role | Permissions |
|---|---|
| Data Markings Manager | Mark data. |
| Security Manager | List all resources/users and manage user permissions and security roles. |
| Server Administrator | Configure server. |
| User Manager | Create users, edit user properties, list all users, and remove users. |
Custom scope
The permissions of a role with a custom scope apply only to specific resources, project branches, or categories. Note that a user or user group can have more than one role with different scopes.
The following table lists all default Teamwork Cloud roles that can have a custom scope:
| Custom scope role | Permissions |
|---|---|
| Resource Creator | (Only category-specific custom scope) Add resources to the selected scope of categories, including the ability to categorize them, create new categories, or manage the existing ones. |
| Resource Manager | Administer/read/remove resources, edit resources, and their properties, list all users, manage model permissions and manage owned resource access rights. |
| Resource Contributor | Edit resources and their properties, read resources. |
| Resource Reviewer | Read resources. |
| Resource Locks Administrator | Release locked elements. |
The following figure illustrates the use of roles and their scopes.
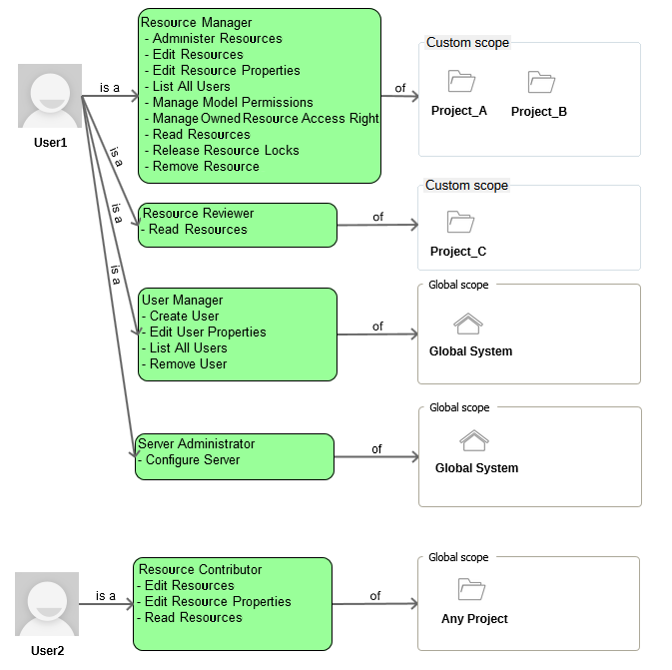
A user can have more than one role with different scopes.
Setting resource and category-specific scope
You can limit the scope of a role assigned to a user or user group to specific resources or all the resources contained in a specific category. When role scope is resource-specific, the role applies only to the selected resources even after they are moved from one category to another. However, when role scope is category-specific, the role applies to all resources in a specific category. This means that the role no longer applies to the resources that are removed from the category. In addition, all new resources added to the category automatically inherit the role with its assignments.
To set resource or category-specific scope from the Roles application
- In the Roles application, select the role whose scope you want to change.
- In the Role pane on the right side of the application portal, click the Change button in the Role assignments card.
- In the Assigned users/groups list, find the user (or user group) whose role scope you want to change. If the user (or user group) is not assigned to this role yet, use the search box to find and add them.
- Click the user's scope selection box and select the Custom scope. If the user already has a custom scope specified for this role, click the Assignments button.
- Do one of the following:
- Select desired resources, to set a resource-specific scope.
- Select desired categories, to set a category-specific scope.
- Click
 to go back to the role assignments window and click
  .
.
To set resource or category-specific scope from the Users application
- In the Users application, select the user (or user group) whose role scope you want to change.
- In the User pane on the right side of the application portal, click the Change button in the Roles card.
- In the Assigned roles list, find the role whose scope you want to change. If the role is not assigned to this user yet, use the search box to find and add it.
- Click the scope selection box of the role and select the Custom scope. If the role already has a custom scope specified, click the Assignments button.
- Do one of the following:
- Select desired resources, to set a resource-specific scope.
- Select desired categories, to set a category-specific scope.
- Click to go back to the user roles window and click
 .
.
Setting project branch-specific scope
You can limit the scope of a role assigned to a user or user group not only to specific resources but to specific branches of a resource as well. For example, you can give permissions for different branches of a model to different teams of engineers who need to work on separate parts of a project independently. Then you can merge the branches when the work is complete.
The branch-specific scope can only be set for roles that contain the Edit Resources permission, e.g., Resource Contributor or Resource Manager roles.
You can specify branch level permissions either from the Roles or from the Users application as described below.
To set branch-specific scope from the Roles application
- In the Roles application, select the role whose scope you want to change.
- In the Role pane on the right side of the application portal, click the Change button in the Role assignments card.
- In the Assigned users/groups list, find the user (or user group) whose role scope you want to change. If the user (or user group) is not assigned to this role yet, use the search box to find and add them.
- Click the user's scope selection box and select the Custom scope. If the user already has a custom scope specified for this role, click the Assignments button.
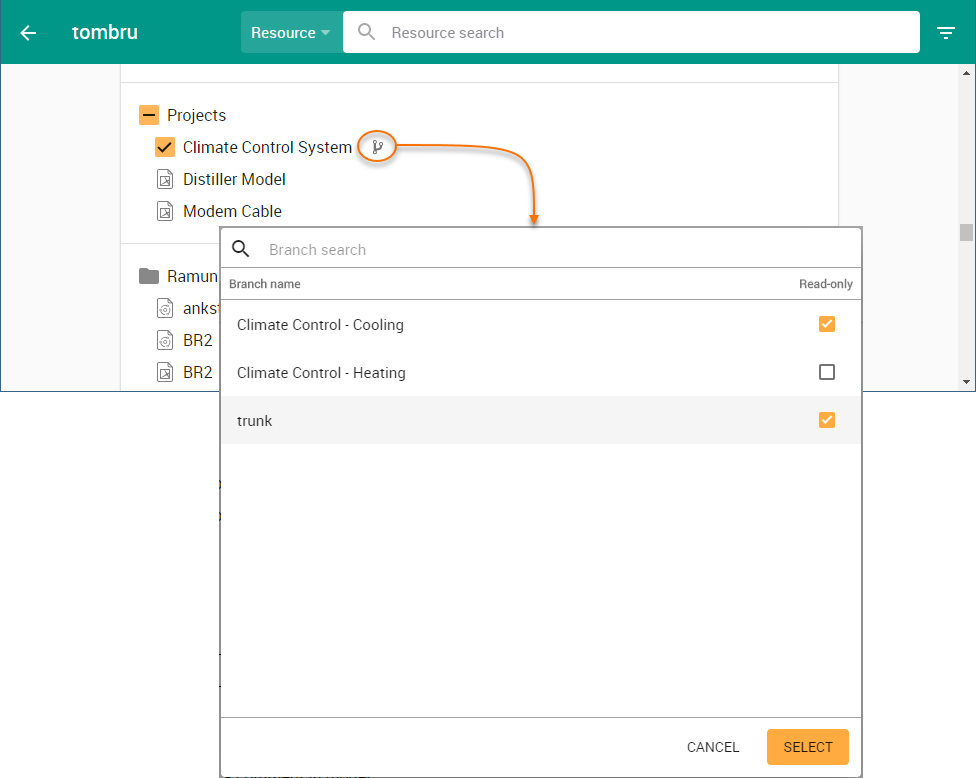
- Select the desired resource and click
 next to it.
 - In the open dialog, select the branches that should be Read-only for the user. The user will have the read-write permissions for all the branches (or trunk) that are not selected.
- Click the Select button.
- Click to go back to the role assignments window and click .
To set branch-specific scope from the Users application
- In the Users application, select the user (or user group) whose role scope you want to change.
- In the User pane on the right side of the application portal, click the Change button in the Roles card.
- In the Assigned roles list, find the role whose scope you want to change. If the role is not assigned to this user yet, use the search box to find and add it.
- Click the scope selection box of the role and select the Custom scope. If the role already has a custom scope specified, click the Assignments button.
- Select the desired resource and click next to it.
- In the open dialog, select the branches that should be Read-only for the user. The user will have the read-write permissions for all the branches (or trunk) that are not selected.
- Click the Select button.
- Click to go back to the user roles window and click .
Now the user has read-write permissions only for those branches of the project that you did not select as read-only. For example, if you set branch level permissions as displayed below, a user will only be able to edit the Climate Control - Heating branch of the Climate Control System project.