On this page
The pre-commit validation runs just before a committing server project to the Teamwork Cloud. This validation protects against violations that are not allowed according to the preset validation suites. You will receive a notification prior to commit completion if the validation fails, according to setup. The notifications can be either a warning (with an ability to continue the commit) or error messages (to disallow commit). Pre-commit validation does not run validations on auto-commits (e.g. when upgrading profiles, on element move to the used project, update from a local file and other).
Required options for pre-commit validation
To enable pre-commit validation, you must set up at least two project options:
or
Customize validation options
Customize validation options in the Project Options dialog.
To open the Validation Options
- Open the Project Options dialog in one of the following ways:
- On the main menu, select Analyze > Validation > Validation Options.
- On the main menu, select Options > Project. In the Project Options dialog, select General > Validation.
- Specify the options you need in the Validation area. How to use the Project Options dialog >>
- Click OK.
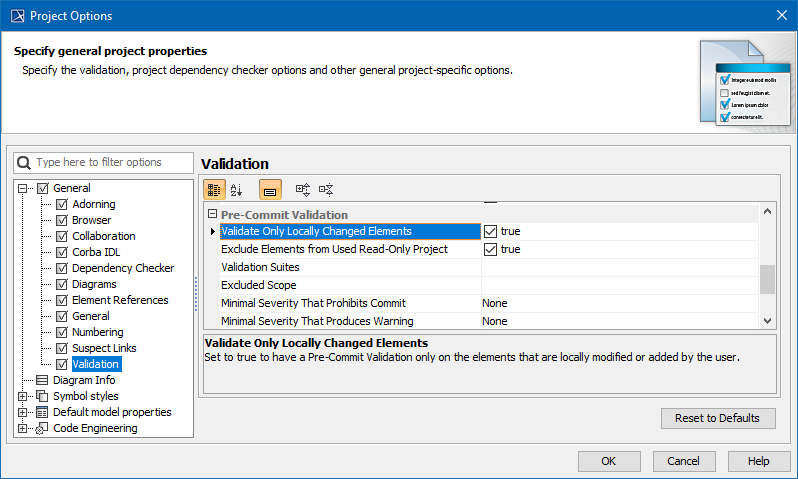
| Option | Values | Description |
|---|---|---|
| Validate Only Locally Changed Elements | True or False | When set to true, pre-commit validation will only run on the elements that are locally modified or added by the user. |
Exclude Elements from Used Read-Only Project | True or False | When set to true, it will exclude projects that are used in read-only mode and elements that exist in these projects. |
| Validation Suites | Validation suites | Specify a validation suites list that must be run before committing changes to a server. |
Excluded scope | Excluded scope | Specify the validation scope to be excluded from the rules that belong to pre-commit validation suites. Elements in the selected scope will not be validated before committing changes to a server. |
Minimal Severity That Prohibits Commit |
| Specify the minimal severity violation severity threshold that prohibits commit. Pre-commit validation will be performed before executing commit to a server. It will validate the model and check if there are validation results with reached or exceeded selected severity levels. Commit will be prohibited until these violations are fixed. |
Minimal Severity That Produces Warning |
| Specify the minimal severity threshold that produces a warning. Pre-commit validation will be performed before executing commit to a server. It will validate the model and check if there are validation results with reached or exceeded selected severity level. If these violations are found, a warning dialog will appear, allowing you either to review warnings or to execute project commit. |
Warning and error dialogs
- If a warning appears, you are allowed to choose whether to review violations or to continue to commit. If you choose to review violations, the pre-commit validation results panel will be open; otherwise, your project will be committed without showing violations.

- If there is an error, you are not allowed to choose. You will get a list of the validation results.
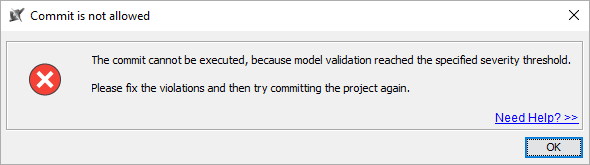
When the pre-commit validation is supposed to show a warning and an error at the same time, the tool will only show an error due to its behavior being more restricted.
Pre-commit Validation Results panel
The Pre-commit Validation Results panel opens after you either get an error message or you select to review violations in the warning message.
It is impossible to ignore Pre-Commit Validation results.

Toolbar
The toolbar allows you to manage the validation results. All buttons are described in the following table
| Button icon | Button name | Description |
|---|---|---|
| Expand All | Click to recursively expand all the elements in the validation results area. |
| Collapse All | Click to recursively collapse all the elements in the validation results area. |
| Navigate to Validated Object (Alt+B) | Click the button to select the element in the Containment tree. Click the arrow next to the button to open the menu of the following navigation commands:
|
| Solve | Click to open the list of available commands to solve a selected element violation in the validation results area. |
| Display the full path of the elements | Click to show the full path of all elements in the validation results area. |
| Run validation with current settings | Click to run the validation with the current settings. |
| Validation Options | Click to open the Project Options dialog with the Validation node open. |
| Export | Click to export the list of validation results either to an .html or .csv file. |


Validation results area
The validation results area provides a list of violated elements. This area contains the following columns:
- Element - elements that violate the validation rule.
- Severity - severity level of the validation rule.
- Abbreviation - a short word, phrase, or acronym of the validation rule used for sorting/filtering.
- Message - description of the invalid situation when a validation rule fails.